A collection of improvements from a year of Gyudons, and an explanation for why you should (sometimes) put the rice on top and not the bottom.

Time: 2/5
The eggs will take up a bit of active time, and quite a bit of passive time
Effort: 2/5
You can’t really walk away, but it doesn’t take that long anyway
Old meal, new tricks
Gyudon is one of those weeknight workhorses that reliably fill the gap whenever I run out of ideas for what to make for dinner. (which doesn’t happen super often, I am proud to say). It lets me lean heavily on the trusty dashi-mirin-soy sauce combo for that comforting Japanese home cooking taste, which works equally well on its own as being a base for further modifications.
I’ve never made Gyudon the same way twice. As a result, random mutations in the process happens, and every now and then something works so well that it earns a place in the recipe the next time I make it.
It’s been almost a year since I first posted my first Gyudon recipe, and I thought it was about time to update you all on some of the product and process innovations that made its Darwinian way into my latest Gyudons. Strap in and look alive, I’m going to walk you through improvements in both the what and the how!
Revamping the sauce
Although I was already a seasoned home cook by the time I came across Samin Nosrat’s Salt Fat Acid Heat, it made me think more about acidity when I taste my food. It has improved my cooking considerably, and more specifically my Gyudon sauce.
Nosrat helped me realise that my Gyudon sauce was missing just a tiny dash of vinegar. Not enough for the sauce to taste sour, but just enough to exist in the background and create some nuance and depth.
That, along with a spoonful of ginger paste, took my Gyudon from good to great. Like, almost midnight in a neon-lit hole in the wall shop in Osaka great. Which is great, because they’re such easy additions – you can just use the ginger paste from an Indian-Pakistani grocery store for making curry, because who has time to grate ginger on a weeknight?
Keeping the beef frozen
The best kind of beef to buy for Gyudon is the kind that begins as a big block of frozen beef, gets sliced while frozen, then gets packaged and put back into the freezer quickly. You want to keep these frozen until the time comes to throw them into the pan, because that way the slices stay separate and distinct!
Because they are sliced so thin, they defrost and cook in short order. It doesn’t take much longer than defrosted slices, and you don’t need to spend the time and effort separating them to add to the pan one by one while trying to avoid ripping and tearing the delicate beef.

Which is a big deal, because if you throw in a big lump of beef all at once it’s difficult to get separate pieces once the lump starts to cook. And lump beef just doesn’t have the same texture as sliced beef! Besides, the outside of the lump would be horrendously over cooked by the time the heat makes it to the middle.
You’ll see how much easier it is to do it this way if you haven’t before. Get beef that has been sliced while frozen, kept frozen, and leave it in the freezer until the pan is ready for them!
Rice on top
I’m sure this trick exists in the great repository of Asian mom collective knowledge, but I’m really proud of (re)discovering this for myself. Bear with me as I rant on for a bit!
The conventional way to construct a lunchbox is to have the rice on the bottom, and the other food on top. This presents the more visually appealing element of the meal on display: the first thing you see and smell when you open the lid is all the colourful and exciting stuff.
However, when the food is very saucy or soupy, you run the risk of the liquid running down into the rice on Monday and turning it mushy after a several-day long soak by Friday. This isn’t a major issue if the sauce is relatively thick, like my Bolog Bowl. You can even intentionally thicken a sauce to get around this problem, such as turning a traditionally soupy Goulash into more of a stew.
But there isn’t much you can do to the Gyudon sauce without fundamentally changing it’s texture – part of the fun of eating a Gyudon, at least for me, is to slurp on the brothy sauce. Instead of changing the sauce, I change the lunchbox anatomy.

By adding the beef and sauce into the lunchbox first and spooning the rice over it, most of the rice is kept out of the broth by the solids. There’s also the additional benefit that the rice will catch any of the sauce that splatters when you reheat the lunchbox in the microwave, and you can mix the rice into the sauce afterwards with little degradation in texture.
The splatter guard effect is especially useful with curries, like my interpretation of Chicken Tikka Masala and Malaysian Style Chicken Curry. Can you imagine trying to clean curry splatter off of the insides of a microwave?
Conclusion
And there’s the main innovations I’ve made by looking closely into my Gyudon making process. Whether or not you’re familiar with my original Gyudon, let me walk you through my newest iteration.

Dramatis Personae
Served 8.
Beef – 2.5lbs, or about 1200g
Like I mentioned above, get beef that was cut while frozen and kept frozen. If it thaws and refreezes, the beef solidifies into a big lump of ice which takes forever to defrost and is super hard to take apart.
Onions – 3 medium
Brings sweetness, aroma and a bit of fiber. Some people like to cook them briefly so they retain their crunch, some people like to stew them into smithereens. I like it somewhere in the middle, you do you.
Garlic – 2 cloves
A tiny bit goes a long way, and garlic isn’t the main focus of a dish like this. All it needs to do is to be in the background and provide a bit of lift. Mince, rough chop or crush and leave whole, in descending order of both garlickiness and effort required. Or, just use garlic paste because the acidic taste of jarred garlic doesn’t matter since we’re adding vinegar anyway.
Gyudon sauce – to taste
I never measure this, because it’s so easy to taste and adjust at the end. This time I began with a 1:1 ratio of soy sauce and dashi (I have a bottle that has both) until there’s enough liquid to cover the onions, then add sugar until it’s sweet enough for your taste. I gave my sauce maybe two teaspoons total.
A teaspoon or so of ginger paste and the tiniest drizzle of vinegar completes the picture. You don’t want so much vinegar that the sauce is noticeably sour, but you want enough that the sauce tastes a bit different.
Baby Napa cabbage – 3lbs, or about 1500g
Always eat your veggies! You see me stack 5 of these up in an impressive pyramid, but it quickly became apparent as I began slicing them up and they started falling apart that 5 is way too much. So I only ended up using only 3.
I like using Napa cabbage for meal prep, and I keep coming back to it again and again. There’s very little hassle involved in terms of washing and prep, relative to the volume of food you get. And high effort-to-reward ratios are exactly what I look for in an S-tier vegetable if I ever make a meal prep vegetable tier list.
Onsen Tamago – 8
The name is Japanese for “hot spring egg”, and it’s an egg that has been barely cooked in not-boiling water until the whites are just barely set. Very nice for some contrast in texture and colour. I’ve shown how to make these before, but to recap you can either step them in a 3:1 ratio of boiling to room temp water for about 15 minutes, or sous vide them at 63C/145F for about 45 minutes.
You’ll see that some of the yolks in this bunch have a very dramatic, almost purple colour. That’s because I finally sprung for the expensive, fancy eggs to see what all the hype is about. Long story short? Couldn’t tell the difference. Back to using pleb eggs for me!

Executive summary
- Cook Onsen Tamago ahead of time.
- Make rice, cook and cut the Napa cabbage.
- Cook Napa cabbage in the pan first, season to taste.
- While Napa cabbage is cooking down, cut onions and gather sauce ingredients.
- Once Napa cabbage is done, stir fry onions in the same plan until lightly browned.
- Add beef and sauce, and stir until the beef is cooked. Taste and adjust seasoning.
- Assemble and serve.
Play by Play

That’s an intimidating amount of Napa cabbage. But have faith, persevere and you’ll be rewarded.


Look, it cooks down and everything is fine at the end!

While the Napa cooks down, that frees me up to break down the onion and mince the garlic.


I like to let my onions pick up some colour before I start adding the other stuff.

A demonstration of why I leave my beef frozen. Look at how the slice of beef folds: each piece stays rigid and separated from the other pieces. I’m never going back to the old method again!


The sauce follows the beef. Stir it around and let everything mingle. Because the beef is sliced so thin, it will defrost and cook in a short amount of time.

Alright, time to line up the boxes and fill them up!

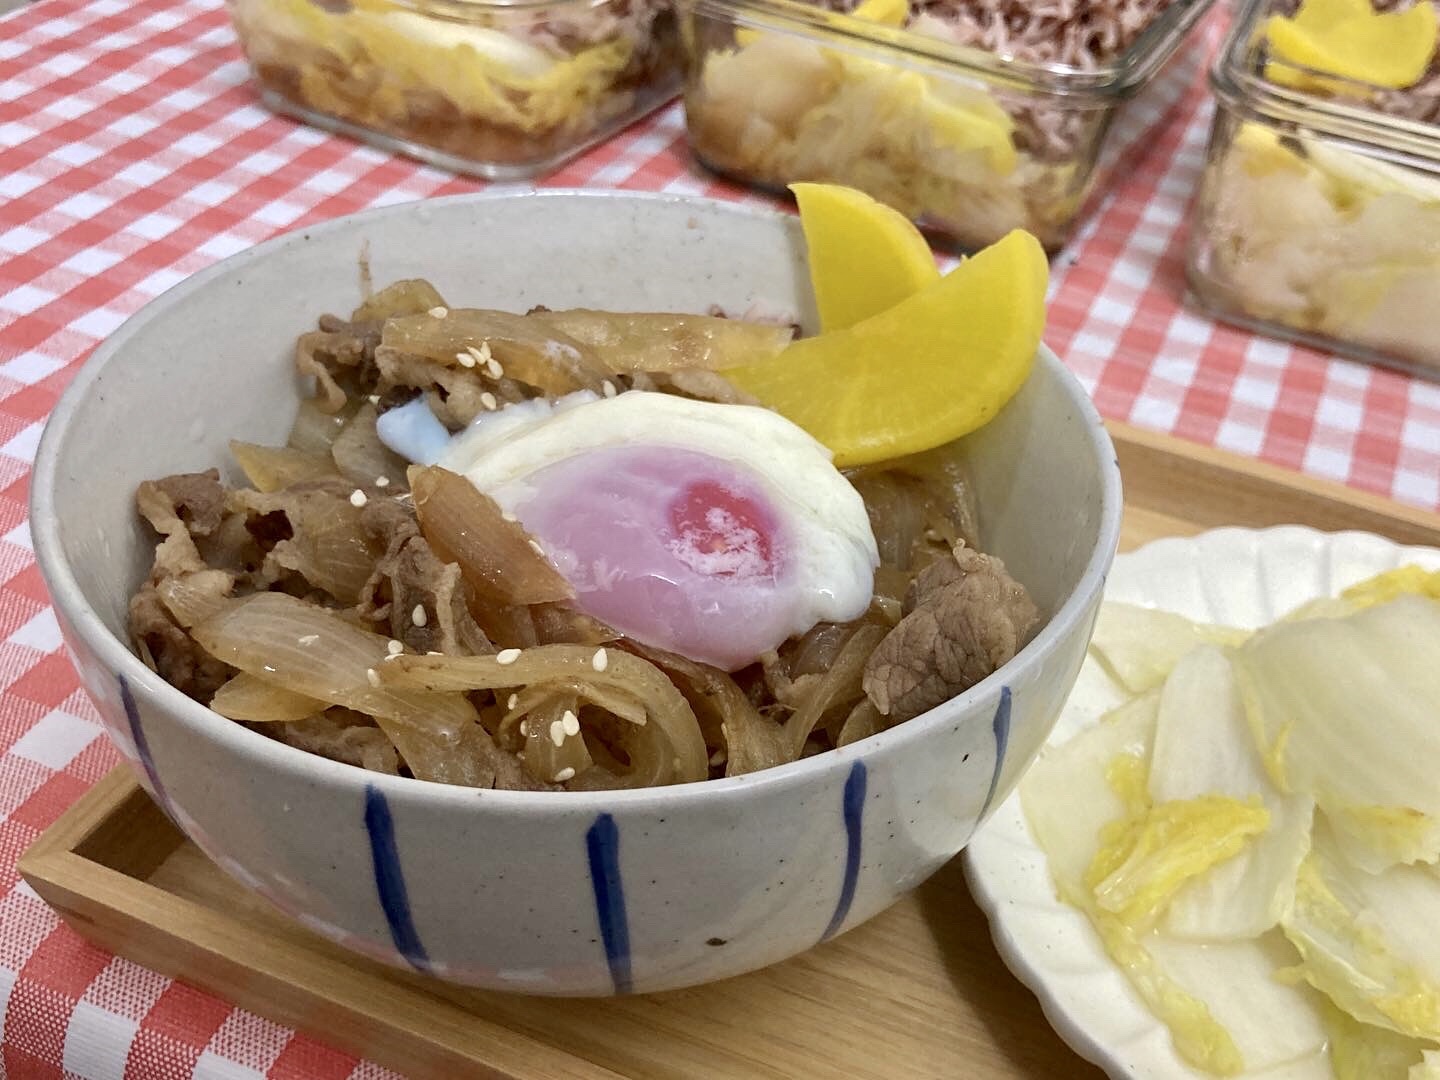
Dinner is served! Top with an onsen tamago for an easy upgrade.

Obligatory money shot.

Improved Gyudon for Meal Prep
Ingredients
- 2.5 lb beef
- 3 medium onions
- Few cloves of garlic
- 100 ml soy sauce
- 100 ml dashi
- Water enough to cover the beef
- Sugar and vinegar to taste
- 8 Eggs
- 3 lb Napa cabbage
Instructions
- Cook the eggs ahead of time. I like to sous vide at 63 degrees for 45 minutes, but soft boiled is also nice.
- Make rice. Wash and cut the Napa cabbage.
- Cook Napa cabbage in the pan first, season to taste.
- While Napa cabbage is cooking down, cut onions and gather sauce ingredients.
- Once Napa cabbage is done, stir fry onions in the same plan until lightly browned.
- Add beef and sauce ingredients, and stir until the beef is cooked. Taste and adjust seasoning.
- Assemble and serve.


Keep browsing by categories, or by tags:
Beef Blog Broccoli Cabbage Carrots Cast iron Cheese Chicken Curry Dashi Date Night Dried scallops Dried shrimp Eggs Fish and seafood Garlic Ginger Glass noodles Gochujang Honey Miso Napa cabbage Onion Oven Pasta Pork Potatoes Salmon Sesame oil Shiitake mushrooms Shrimp Soup Sous Vide Steaming Stewing Stir fry String beans Sweet potatoes Teriyaki Tofu Tomatoes Vacuum cooker Vegetarian Yogurt Zucchini