The true essence of the Japanese beef bowl is the sauce, infused with the flavour of lightly caramelised onions and the meaty goodness of thinly sliced beef, served over steaming rice.

Time: 2/5
Less than an hour from start to finish
Effort: 2/5
No prep, no marinade, one pan only.
Beefy juicy satisfaction
Years ago, I was traveling with my SO in Osaka, Japan. After a fun but exhausting day, we sought to rest our aching feet and placate our growling stomachs in a chain restaurant, the lighted billboards outside loudly advertising the various rice bowls served therein. It was quite late, well past 9pm, when we saw a stoic middle aged man in a suit sit down at the table next to ours. With very few words, he ordered a steaming bowl of beef over rice and a whiskey highball in a tall glass; without a word, he proceeded to wolf down the rice and beef, then down the highball in 3 big gulps. Putting down some money, he stood up and left mere minutes after he walked through the door.
Gyudon is found in abundance in Japan and nearby regions where it’s a quick and affordable meal that has satisfied many a salaryman’s hunger in a hurry. Being a Gyudon fan myself, I was pleasantly surprised to find that it is quite simple and quick to replicate it in a home cook, and even more pleasantly surprised to find out that it lends itself to meal prepping as well. I consider it part of a greater family of rice bowls like the Pork Bulgogi Bowl and Butadon.
The uninitiated may be forgiven for mistaking the beef for being the star of the show, given that it features prominently in the name of the recipe. However, its true purpose is to impart its beefy flavour to the sauce and onions, which when mixed with rice is a transcendent gustatory experience.
This week, the sides consisted of a onsen tamago (eggs gently poached until the whites are barely set), some eggplant agabetashi and some homemade kimchi (which, although not in line with the Japanese theme, was delicious nonetheless). The gyudon itself took no more than 30 minutes, and the whole process including the cleanup was all wrapped up in an hour.
I experimented with a different sort of workflow in this week’s meal prep where the components were stored separately, then assembled before serving. The most key innovation was to keep the sauce separate from the rice and beef during storage, to avoid the rice from sitting in a pool of liquid for days in the fridge and developing an unpleasant mushy texture. It did mean more dishes to do, but in my opinion it was well worth the effort to avoid soggy rice syndrome.
2024 update: After several months of trial and error, I’ve come up with several improvements to this old recipe. Check out the New Improved Gyudon recipe for all the tips and tricks, as well as an argument for why you should construct your bento boxes with the rice on top.

Dramatis Personae
Beef – 100-200g pax
Fattier cuts of beef sliced paper thin are ideal for Gyudon. Unfortunately, it does make this dish rather calorie dense. I find them already sliced and packaged in the stores around me, but you may have to improvise. I have seen some stores serve thicker cuts of flank or skirt steak instead with delicious results, but those sturdier textures don’t quite evoke the nostalgia of the sloppy chain-store style beef sauce.
Onions – Yellow, 1 large pax
A key component, for their sweetness and liquid. Use plenty of onions and slice them thin. It makes a difference whether you slice them across their ‘equator’ or pole-to-pole – with the former the slices will break down as they stew and integrate more into the sauce, while with the latter they will stay more intact and retain more texture. I prefer to slice them pole-to-pole for this application.
Sauce
The sauce consists of a 1:1:1 ratio of soy sauce, dashi and mirin plus an optional hint of garlic. This is an all-purpose sauce I use as a cheat code to make anything taste Japanese. I buy dashi ready-made from the store, but you can easily learn how to make it yourself on the Internet. Mirin could be substituted in a pinch with any clean-tasting alcoholic beverage plus sugar, such as sake or white wine. You may adjust the sauce, such as with sugar or water, salt to taste.
Sides
Any vegetables should pair decently well. I’ve recently become obsessed by this Japanese eggplant salad-esque thing where pieces of eggplant are fried and infused with a dashi-based broth. I also had tons of kimchi from an earlier attempt to refine a family recipe, so into the meal it goes for a probiotic and flavour boost.
Executive summary
- Get rice cooking
- Slice onions and garlic
- Stir fry onions until lightly caramelised. Add garlic and stir fry briefly
- Add beef slices and sauce components. Stir to combine
- Cook until beef is no longer red. Taste and adjust for seasoning
- Be amazed by how little time it took
- Be amazed by how good it tastes for how little time and effort it took
Play by Play

I like slicing my onions pole-to-pole so they keep their shape. Using a sharp knife will help avoid producing clouds of biological tear-gas.

Let the onions sweat and caramelise. That will take 10 minutes or so. In the meantime, peel and slice some garlic. If there’s still time, prepare thinly sliced scallions for garnish.

Notice how the onion is a little brown – it has developed some nice sweet, toasty flavour, The garlic needs much less time than the onions, so it goes in now for a brief stir fry..

Beef goes in next, followed by the sauce. The pre-sliced beef really does take a lot of work out ofthis meal, seeing as it cooks quickly and absorbs flavour well.

A quick stir to combine, then let it simmer until the beef is done.

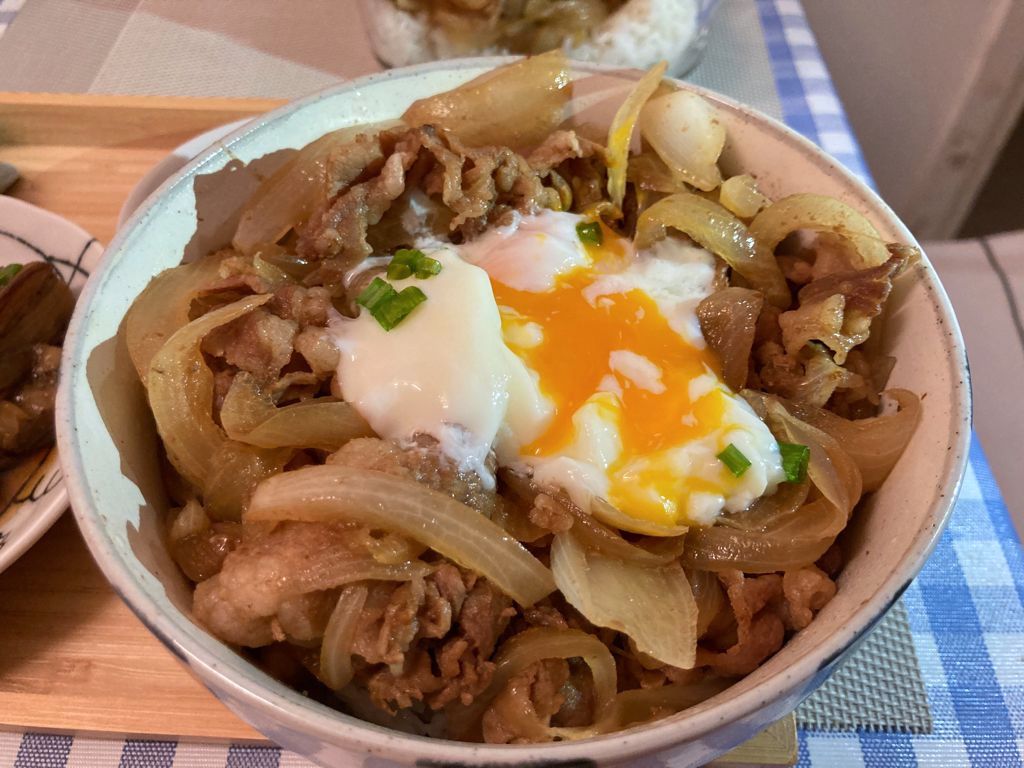
And we’re Don! (Sorry, not sorry.) Not bad for a weeknight. The eggplant agebitashi in particular was delightful.

The beef and onions can chill with the rice, but I kept the sauce separate in a big bowl. They will be reunited before reheating in the microwave to prevent rice getting soggy. The sides and the egg aren’t supposed to be microwaved, so they will also hang out separately in the fridge until it is time to eat.

Check out that yolk glistening under the barely-cooked egg white, so irresistible …


Gyudon – Weeknight Japanese Beef bowl
Ingredients
- 1000 g beef thinly sliced
- 1 large onion
- Several cloves of garlic
- 6 tbsp soy sauce
- 6 tbsp dashi
- 6 tbsp mirin
- 1 tsp sugar
- Water to taste
Instructions
- Get rice cooking. Slice onions and garlic
- Stir fry onions until lightly caramelised. Add garlic and stir fry briefly
- Add beef slices and sauce components. Stir to combine
- Cook until beef is no longer red. Taste and adjust for seasoning
- Serve hot.


Keep browsing by categories, or by tags:
Beef Blog Broccoli Cabbage Carrots Cast iron Cheese Chicken Curry Dashi Date Night Dried scallops Dried shrimp Eggs Fish and seafood Garlic Ginger Glass noodles Gochujang Honey Miso Napa cabbage Onion Oven Pasta Pork Potatoes Salmon Sesame oil Shiitake mushrooms Shrimp Soup Sous Vide Steaming Stewing Stir fry String beans Sweet potatoes Teriyaki Tofu Tomatoes Vacuum cooker Vegetarian Yogurt Zucchini